Summer means loads of fresh vegetables, and that makes me happy.
Today’s recipe is a quick, under-30-minute meal for a meatless night or
a great side dish to your grilled meats. There are really no rules
about ingredients in my recipe. If you don’t like carrots, leave it
out. Not a fan of broccoli, substitute asparagus. As I always
say, make this recipe your own. Today I’m using a small head of
broccoli, carrots, green beans, red onion, colorful bell peppers, and
mushrooms. A cup of chopped raw broccoli will yield 2.6 grams of
protein, while a cup of cooked broccoli contains about 1.9 grams.
Broccoli deserves its reputation as a “superfood” because it’s high in
fiber, folates, vitamin C, vitamin K, and potassium. Flash sauté them
for just a few minutes. Combined with the other ingredients, they make a
sassy stir-fried vegan/vegetarian dish. Serve with brown rice or over
pasta. For added protein, add 1/2 cup of cooked legumes, raw cashews or
walnuts, tofu, or other protein.
Group the veggies by the amount of time they take to cook. Start your
cooking first with the dense vegetables that take longer to cook, such
as, onion and bell pepper. Add the light cookers last, and mushrooms fall
in the middle of the sequence. Broccoli placement depends on taste, if you prefer
it crisp or softer. Obviously, the softer you want it, the longer it
cooks.
Ginger Garlic Vegetable Stir Fry
Use organic when available. Serves 4
Ginger
Garlic Vegetable Stir Fry is ready in less than 30 minutes using the
freshest summer vegetables. Depending on your additions, it fits most
diets: Vegan, gluten-free, dairy free, vegetarian.
Ingredients
Sauce
2tspsesame oil
1/2cup vegetable stock or water
1tbspgrated or minced fresh ginger
2cloves garlic, minced
1/4cuptamari or low sodium soy sauce
1tbsprice vinegar
1 tbspmaple syrup or honey
1tbspcorn starch
Optional for spicy sauce: 1/4 tsp of crushed red pepper flakes or to taste
Stir Fry
2tbspolive oil
3/4cupsliced carrots
1/2cuphalved fresh green beans
1/2cupsnow peas
1/2cupsliced red onion
1small head of broccoli, cut into florets
1/2medium bell pepper, thinly sliced
1 cupsliced fresh mushrooms (3 oz)
1/2cupoptional raw nuts, sesame seeds, legumes, or tofu
Instructions
Whisk together all sauce ingredients in a small bowl and set aside.
Heat oil in a large skillet or wok over medium-high heat
Add onion, carrots, and bell pepper and cook for 2 minutes
Add broccoli and cook for 1 to 2 minutes
Add mushrooms to the pan and cook for 1 to 2 minutes or until tender
Add the rest of the vegetables for an additional minute of cooking
Optional: add nuts, seeds, legumes, or other protein in the middle of the stir-fry depending on the time needed to cook
Whisk sauce again and pour over vegetables in pan
Cook until thickened, stirring constantly, 1 to 2 minutes
Remove from heat
Serve over steamed brown rice, noodles, or other grain
Optional garnish with chopped green onions, sesame seeds, or nuts
Today’s recipe, Ham & Veggie Pasta, is a hearty meal but easy to
make for busy weeknights. What makes it superb for summer is all the
cooking is in one stove top pot. For summer, I suggest you buy a center
cut ham steak of about 1 to 2 pounds. 2 cups of chopped ham is
approximately 1 pound; you’ll need 2 1/2 cups for 6 servings. When fall
and winter comes, use leftovers from your baked ham. I used a defrosted
frozen green peas and carrot mix for my veggies, but you could just use green peas or another vegetable.
I like cute bow tie pasta (Farfalle), but you can change up this
recipe by using a different pasta shape or switching out Parmesan for
another cheese. If you don’t eat pork, substitute bite-sized pieces of
other cooked protein. The sauce is based on low sodium chicken broth and
half-and-half. Half-and-half comes in variations, including low-fat and
fat-free varieties. Regular half-and-half is 10.5% to 12% fat. Low-fat has 50% less fat than regular half-and-half.
Fat-free half-and-half has one-tenth the fat of regular half-and-half. I
suggest low fat half-and-half to cut fat but retain the creamy flavor.
One Pot Ham & Veggie Pasta
Use organic when available. Serves 6.
Ingredients
1tbspolive oil
2 1/2cupscubed cooked ham
1/2cupchopped onion
1clove garlic minced
1tspItalian seasoning
1/4tspred pepper flakes
4 cupslow-sodium chicken broth
1 1/4cuplow-fat half-and-half
1/4cupflour
16ozpackage farfalle (bow tie) pasta
2cupsfrozen peas and carrots defrosted
1/2cupgrated Parmesan cheese
salt and pepper to taste
optional chopped parsley for garnish
Instructions
Heat olive oil in a large pot over medium heat
Add onion and ham
Sauté for about 3 minutes
Add garlic and cook until fragrant, about 30 seconds
Stir in Italian seasoning, red pepper flakes, salt and pepper
Cook for 2 minutes
Whisk together chicken broth, half-and-half, and flour in a bowl until smooth
Pour into the pot of ham mix
Stir in farfalle pasta, cover, and cook for 15 minutes
Add peas and carrots
Cook until pasta is cooked through, about 8 more minutes
Summer is the time when fresh vegetables are plentiful. Today’s
salad is a marinated dish of fresh green beans, tomatoes, red onions,
and olives with a sprinkling of feta. The dish should marinate at least
3 hours in a refrigerated covered dish, but I like to leave it
overnight. You can double the recipe for a big bowl for a cook-out or
use the recipe for your immediate family. Make it to your family’s
taste; my sister loves black olives while I love green. Fresh tomatoes
can be small grape tomatoes or large heirloom tomatoes chopped into
bite-sized pieces.
Green beans are a very healthy vegetable and are packed with
nutrients such as Vitamin A, C, and K, potassium, iron, and calcium.
Green beans are also low in calories, low sodium, low-carb and high in
fiber. Plus the Greek inspired dressing is easy and so tasty.
Green Bean Salad With Tomatoes, Olives & Feta
Use organic when available. Serves 4
Green bean salad is made with fresh green beans, tomatoes, feta cheese and olives, all tossed in a Greek style dressing.
Ingredients
Salad
1lbfresh green beans trimmed (halved if desired)
1cupcherry or grape tomatoes halved (or tomato of choice chopped)
1/4cupred onion sliced
1/3cupkalamata olives pitted & sliced (or olive of choice)
1/4cupchopped fresh basil or oregano
1/4cupoptional almond slices or chopped walnuts
1/2cupfeta cheese crumbled ( or goat cheese or shaved parmesan cheese)
Dressing
1/4cupolive oil
2tbspred wine vinegar (or apple cider or balsamic)
1clove garlic minced
1tbsplemon juice
1tspDijon mustard
salt and pepper to taste
Instructions
Heat salted water to boil and add green beans
Cook about 3 minutes until just tender
Remove beans and plunge into a bowl of iced cold water to cool
Drain beans and pat dry
Place beans in serving dish
Heat oil over medium heat in skillet
Add crushed garlic and cook until just fragrant about 30 seconds
Succotash originated from Narragansett Native Americans living in the area now known as Rhode Island.The name is derived from a Narragansett word meaning “broken or boiled corn kernels.”Native Americansintroduced succotash to struggling colonists in the 1600s.
In a few weeks, it will be 4th of July. Today is the perfect time to introduce a
historic fresh vegetable side dish originally shared by Native
Americans in the 1600s. Succotash is a highly underrated dish made with
fresh sweet corn kernels, squash, onion, tomatoes, and lima or other
beans. I remember enjoying it as a child with summer meals. Many
Americans consider it a southern dish, but there are variations of the
dish across the country. Now in modern times you can personalize the
seasoning blend to be Greek, Latin, or Cajun. For example, you could
use a green bell pepper or a red one. Today I am adding green beans,
red bell pepper, cumin, and a jalapeño pepper. You can add whatever
beans you have. Nearly every version has lima beans included but
sometimes with the addition of other beans. I recommend using fresh
vegetables in the summer if available, except for the lima beans. You
may use frozen lima beans defrosted.
Fresh Succotash
Use organic when available. Serves 6
Ingredients
6ears of corn kernels cut off the cob (abt 1 1/2 cups)
1/2onion diced
1/2red bell pepper diced
1Jalapeño pepper seeded and sliced
3cloves garlic minced
1/2cupdiced fresh tomatoes
1/2tspground cumin
1pinch cayenne pepper
2zucchini cubed
1/4cupfresh green beans cut to 1/2" pieces
1tbspolive oil
1 1/2tspbutter or margarine
1/2cupwater
1cupbaby lima beans (can use frozen and thawed)
Instructions
Heat olive oil and butter in a skillet over medium heat
Add onion and cook stirring often for about 6 minutes until onion is soft and slightly golden
Add red pepper, jalapeño, and garlic; stir and cook for 3 or 4 minutes until red pepper is softened
Stir tomatoes, cumin, black pepper, and cayenne pepper into onion mixture
Cook and stir for 1 to 3 minutes until heated
Add zucchini, green beans, water, and a pinch of salt
Cook until zucchini is tender about 5 minutes
Add corn and lima beans to mix and heat about 3 to 5 minutes
Many recipes call for sautéed greens – a little olive oil and garlic
with spinach, kale, chard, collards. All the greens you can name taste
good with olive oil and garlic. If you want to really raise it a notch,
add a couple of shallots, some onions, or leeks. A fine combination of
flavors that can start your day with a warm dish, provide a tasty lunch,
or even an easy dinner when paired with eggs. Wash the greens, remove the ribs, and chop or tear the leaves.
I like fried eggs myself, but if you want to cut calories and fat, try
poaching eggs to nestle in your greens. Add a crusty slice of bread and
your meal is complete. To make a week of really fast breakfasts, sauté a
huge amount of greens and keep in the refrigerator. Each morning, warm
some greens and add poached eggs or a dollop of yogurt for a quick start to the
day.
Sautéed Greens & Eggs
Use organic when available, makes 4 servings
Ingredients
4cupsfinely chopped greens like kale (chard)
2shallots
2clove garlic thinly sliced
2tbspolive oil
4 to 8eggs
4cupswater
1tspapple cider vinegar
salt and pepper to taste
Instructions
Add shallots and garlic to olive oil in pan over medium heat
Cook for a minute
Add greens
Toss to coat and cook for 2 to 4 minutes until kale is wilted
Season with salt and pepper
Bring water and vinegar to simmer in large skillet
Remove eggs from shell and add eggs one at a time
Water in skillet should cover eggs
Poach eggs until white is set about 5 minutes
Remove from water with slotted spoon
Nestle eggs in a plate of greens; serve with crusty breadEnjoy!
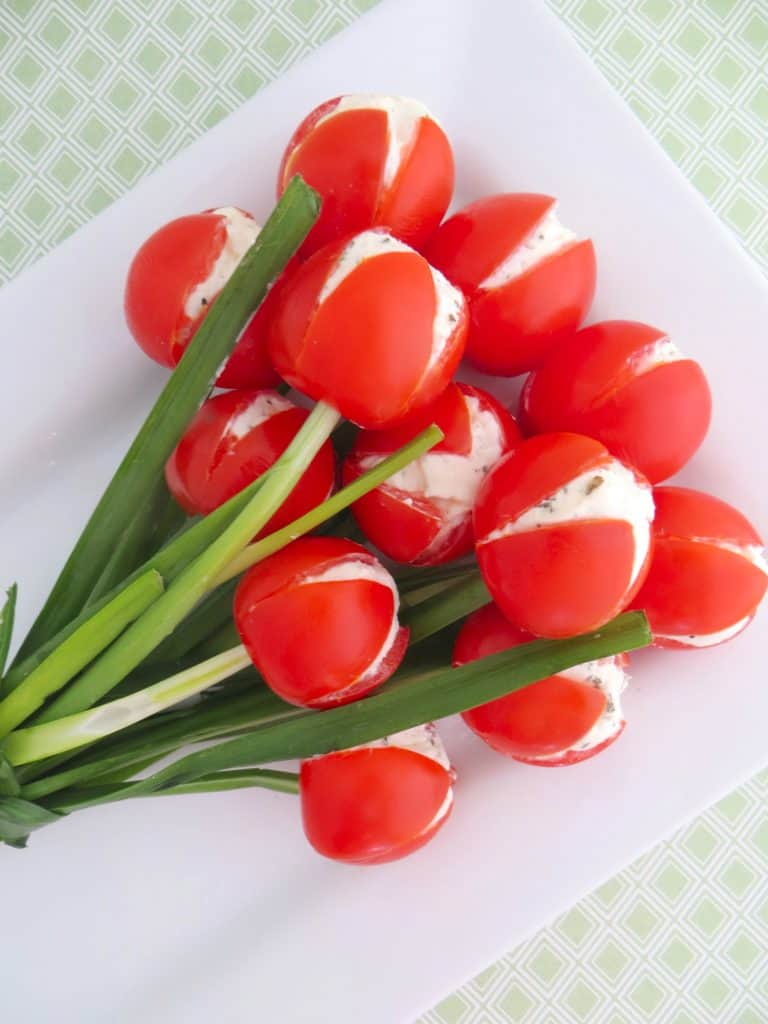
I love cute food art. For the last few years, I’ve been trying some of my favorite pins of Food Art. One of the spring appetizers I love is Tulip Tomatoes. It is shown in a bouquet of tulip tomatoes on chive greenery. It is so cute. Below is the photo found all around the internet.
I like that tulip tomatoes are a healthy side dish perfect for any spring or summer occasion. Everyone says this food art can be created in less than 30 minutes. It took a little longer for me. This post is a little different from most of my food posts. Have you ever tried to replicate a pin and wondered what happened?
Above are more of the original photos on making tulip tomatoes. They
must have originally been on a blog or social media that no longer
exists. I’ve found over 12 blogs with the same photos
and instructions on this food art. My recommendation is to first decide
if you just want a decoration for your table, or if you want appetizers
to eat. If you just want a decoration, go with the idea of a tied
bouquet. If, like me, you want pretty finger food, I’ll try to give you
easy ideas.
The tulip tomatoes are made with mostly fresh ingredients like cucumber, cream cheese, tomatoes, and green onions or chives.
The original instructions say to make a cross on top of large cherry tomatoes, going 3/4 way deep. Scoop out the seeds with a spoon; a grapefruit spoon is suggested. First, DO NOT GO 3/4 DEEP! The little tomato becomes too flimsy and you will have cream cheese everywhere. I know as I did it. I suggest 1/2 deep. Then you use a toothpick or
skewer to make a hole where the stem was on the bottom. Push a green
chive through the hole to make a stem.
The original recipe uses a filling of cream cheese, cucumber, and dried
parsley. It really sounds a little bland to me, and I added lemon juice
too. It was still too bland. I think the dried parsley would add more
flavor if it is added to the cream cheese and put back in the
refrigerator for a day. The original recipe says to use a teaspoon full
of cream cheese mix in each tomato. I bought large cherry tomatoes, and
they are still small for 1 teaspoon. I saw another blogger piped the
filling in which probably makes it easier to fill the tomato. It is a messy procedure filling the top
with a spoon and keeping the chive in the bottom hole. I had lots of
leaks from both ends. Use a clean paper towel to clean the outside of each tomato.
I believe a better filling would perk up the taste of the little
appetizer. I was tempted to just buy garlic and onion cream cheese when
I went shopping for the ingredients. I think that or the herb flavored
cream cheese would be tasty and so easy to use. I think that adding
minced or processed cucumber makes the cream cheese too watery.
Cucumbers are pretty much water in composition.
You could try your favorite dip as long as it is firm enough. Over on One Little Project, Debbie makes a whipped Feta/cream cheese filling.
It sounds interesting. Then I made my tomato flowers on a plate. Originally, the recipe said to tie the green stems with a chive like a
bouquet. If you want appetizers, don’t tie the bouquet and make a
single layer of flowers. If you want a decoration, then tie the bouquet.
I
know that trying to pick up the little flower tomato will make the
eater’s hands messy. I think serving them with toothpicks is a better
idea. Below you’ll notice that the green stems do not go into the bottom
of the tomato. I tried both ways (above and below) and believe not all
the guests would want to eat the green chive. Placing the tomato on
the top of the chive gives the same look, but the tomato can be lifted
from the plate with a toothpick without chives.
I started thinking about serving them at the dinner table. I like Roma tomatoes for a good size to make tulips. I again cut a cross on
the top and scooped out the seeds. If the tomato does not have a flat
bottom, cut the bottom to level it. This time I used hummus as the
filler; there are so many flavors I can try. I served the tulip tomato
on a saucer with romaine lettuce for leaves. I think it’s a great first
course or snack. I ate two of them with whole grain crackers for lunch.
I cut the tomato into pieces with a knife and fork and ate it with my
fork. It was yummy, and my hands were clean.
Whether you want small tomato tulips on an appetizer plate or larger Roma sized tulips, choose your filling of choice, make the tulips and
arrange with chosen greenery.
Tomato Tulip Appetizers
Use organic when available. Makes 16 tomato tulips.
Ingredients
Cherry Tomato Tulips
16large cherry tomatoes
16stalks of chives
8ozflavored cream cheese or favorite dip
Roma Tulip Appetizers
1 or 2Roma tomatoes per person
romaine leaves or other green vegetable for each Roma
8oxflavored cream cheese or favorite dip
Instructions
Cherry Tomato Tulips
With stem side down, cut a cross in the top of each cherry tomato (about 1/2 down the tomato).
Using a spoon (grapefruit spoon works very well) to gently scrape out the tomato seeds.
Option
1: Take a grilling skewer or toothpick and make a hole where the stem
currently is. You may need to twist the skewer in a circle a few times
to make room for the chive to fit through.
Option 2: Do not make a hole in the bottom of tomato.
Starting with 1/2 tsp of filling, fill tomato top. Adjust amount according to size of tomato.
Option 1: Insert a chive into the hole at the bottom of each tomato.
Use a damp paper towel to clean any excess filling from outside of tomatoes.
Option 1: Make a bouquet of chive flowers and wrap last chive around the green chive stems and tie.
Option 2: Place green chives on plate or platter like stems of flowers.
Option 2: Place tomato flowers on top of green chives. Add tooth picks.
Cover and refrigerate for several hours.
Serve on plate or platter chilled.
Roma Tomato Tulips
With stem side down, cut a cross in the top of each tomato (about 1/2 down the tomato).
Using a spoon (grapefruit spoon works very well) to gently scrape out the tomato seeds.
Starting with 1 tsp of filling, fill tomato top. Adjust amount according to size of tomato.
Clean outside of tomatoes with damp paper towel.
Shape romaine leaves to look like flower leaves and place on saucer.


.jpg)