Halloween is a fun holiday for everyone. The drawback to me is that it is a time of great excess sugar. No, I don't think children or adults even should entirely give up treats and desserts. I do think that besides the sweet treats, there should be some that are cute and more healthy.
In my family, that starts with deviled eggs. No matter the holiday, we look for a plate of deviled eggs that disappear rapidly. We love them in all seasons. I also personally love food art. This Halloween appetizer is cute, appropriate to the season, and lower in sugar.
Halloween Spider Deviled Eggs
Use organic when available. Makes 12 spiders
Ingredients
6peeled hard boiled eggs
1 tbsp mayonnaise
¼tspDijon mustard
12black olives
salt & pepper to taste
optional a pinch of paprika
Instructions
Cut each egg in half lengthwise, remove yolks
Place yolks in a bowl with mayonnaise, mustard, salt, and pepper
Mash yolks and stir mixture until smooth and thoroughly combined
Fill each egg half with deviled yolk mixture using spoon, piping bag, or sturdy plastic bag with a corner cut off
Cut olives in half and place 1/2 on each filled egg
Cut other olive half into 4 strips & then cut each strip in half
Use 8 thin olive pieces for the legs with 4 olive legs on each side of the spider & sprinkle with paprika (optional)
For Halloween fun, make a spooky platter of a spider on green dip using pepper for the spider and spinach artichoke hummus for the dip. It looks great and is so tasty too!
Choose an orange pepper that looks like a body of a spider (with a little help). I cut the bottom off and deseeded the pepper.
I cut a spidery body shape (maybe) and added 2 holes filled with half a dried cranberry for eyes. You could also just use edible black paint.
I used the rest of the pepper to cut lengths of legs to surround the body. I placed the pepper parts on a bowl of spinach artchoke hummus. Golly, it tastes so good and has a nice green color.
I placed the white bowl of dip & spider on a black plate and surrounded it with cut veggies. This appetizer is cute, tasty, and healthy.
I put the plate on a charger with a vintage thrift store doily in orange trim on top. I like the look for my party.
Now if you want to get creative, homemade dip always tastes better to me than commercial brands. I also like knowing exactly what's in my food. This hummus recipe makes a great thick dip which holds the pepper spider perfectly.
Spinach Artichoke Hummus
Use organic when available. Makes 1 1/2 cups or about 4 Servings
Ingredients
1 can of cooked chickpeas drained (reserve fluid) or about 1 1/2 cups cooked chickpeas
2 tbsp tahini (sesame paste)
1 cup fresh spinach sauteed in a little olive oil
1 cup marinated artichoke hearts drained & chopped
1 tablespoon lemon juice
1 small garlic clove
salt & pepper to taste
a drizzle of really good extra virgin olive oil or about 2 tsp
Instructions
Place chickepeas in a blender or food processor with tahini, spinach, artichokes, lemon juice, garlic, salt & pepper
Blend at high speed until smooth; add 2 tsp reserved liquid if too dry
Add 2 tsp of olive oil and blend again
Chill in the refrigerator until served
Serve with fresh vegetables, flatbread, toasted crostini, or pretzels
Today we're making food art for spring and Easter. It's a classic bunny cake that has been around since the 1950s.
You can use cake mix or your favorite cake recipe for two 8" or 9" cake pans. I like the coconut version with coconut added to a white or yellow cake and patted on the white icing to make a white bunny look. I've also seen it done without coconut and even in chocolate for an adorable brown bunny.
One cake is the head and the second is cut for other parts. Above are two ears on the sides and the middle piece becomes the bow tie below the rabbit head. You can cover a tray with aluminum foil, parchment paper, or even a big doily. If you like, you can use food color to make some pink icing or coconut for the ears and green to make grass around the bunny head. You can place bunny ears turning up or down.
The easiest decorating is based on white icing, coconut, jelly beans, and other candies like licorice or Twizzlers. If you are a talented cake decorator with icing, I've seen very artistic cakes cut in this shape and totally decorated with icing for eyes, nose, mouth, whiskers, and even flowers. This is a great holiday activity with the kids. Let them decorate the bunny cake.
Easter Bunny Cake
Use organic when available. Makes 12 servings.
Ingredients
28" or 9" layers of yellow or white cake baked
4cupsflaked coconut
white icing for 2 layer cake
optional food coloring for coconut or icing
candy for decorations
Instructions
Cover serving tray with aluminum foil or doily
Remove cool cakes from pans
Place one whole cake layer on serving tray
Cut 2 convex shaped ears from each side of the second layer
Place ears on each side of head to form ears
Use concave shaped piece for the bowtie, place about 1/2 inch below head
Frost each piece of bunny with white icing covering top and sides of bunny.
Frost bowtie with colored icing such as blue or green
Pat remaining coconut evenly over top and sides of bunny head and ears
Use colored frosting, jelly beans, licorice, etc. to decorate cake as desired; licorice can be cut in thin strings for whiskers
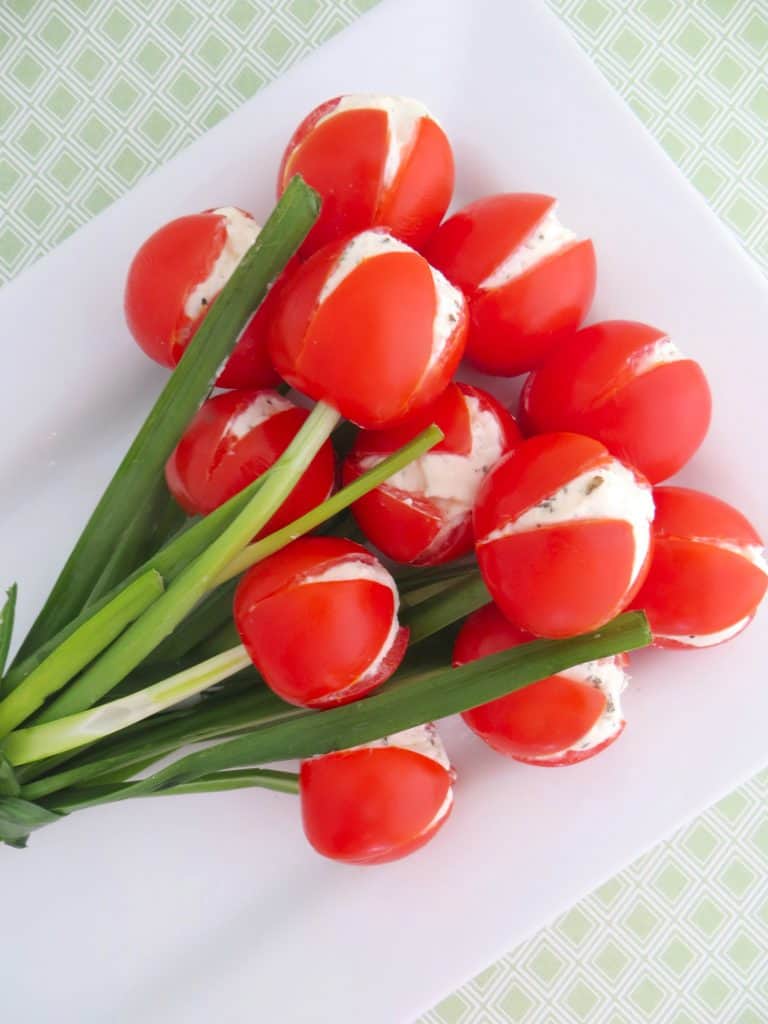
I love cute food art. For the last few years, I’ve been trying some of my favorite pins of Food Art. One of the spring appetizers I love is Tulip Tomatoes. It is shown in a bouquet of tulip tomatoes on chive greenery. It is so cute. Below is the photo found all around the internet.
I like that tulip tomatoes are a healthy side dish perfect for any spring or summer occasion. Everyone says this food art can be created in less than 30 minutes. It took a little longer for me. This post is a little different from most of my food posts. Have you ever tried to replicate a pin and wondered what happened?
Above are more of the original photos on making tulip tomatoes. They
must have originally been on a blog or social media that no longer
exists. I’ve found over 12 blogs with the same photos
and instructions on this food art. My recommendation is to first decide
if you just want a decoration for your table, or if you want appetizers
to eat. If you just want a decoration, go with the idea of a tied
bouquet. If, like me, you want pretty finger food, I’ll try to give you
easy ideas.
The tulip tomatoes are made with mostly fresh ingredients like cucumber, cream cheese, tomatoes, and green onions or chives.
The original instructions say to make a cross on top of large cherry tomatoes, going 3/4 way deep. Scoop out the seeds with a spoon; a grapefruit spoon is suggested. First, DO NOT GO 3/4 DEEP! The little tomato becomes too flimsy and you will have cream cheese everywhere. I know as I did it. I suggest 1/2 deep. Then you use a toothpick or
skewer to make a hole where the stem was on the bottom. Push a green
chive through the hole to make a stem.
The original recipe uses a filling of cream cheese, cucumber, and dried
parsley. It really sounds a little bland to me, and I added lemon juice
too. It was still too bland. I think the dried parsley would add more
flavor if it is added to the cream cheese and put back in the
refrigerator for a day. The original recipe says to use a teaspoon full
of cream cheese mix in each tomato. I bought large cherry tomatoes, and
they are still small for 1 teaspoon. I saw another blogger piped the
filling in which probably makes it easier to fill the tomato. It is a messy procedure filling the top
with a spoon and keeping the chive in the bottom hole. I had lots of
leaks from both ends. Use a clean paper towel to clean the outside of each tomato.
I believe a better filling would perk up the taste of the little
appetizer. I was tempted to just buy garlic and onion cream cheese when
I went shopping for the ingredients. I think that or the herb flavored
cream cheese would be tasty and so easy to use. I think that adding
minced or processed cucumber makes the cream cheese too watery.
Cucumbers are pretty much water in composition.
You could try your favorite dip as long as it is firm enough. Over on One Little Project, Debbie makes a whipped Feta/cream cheese filling.
It sounds interesting. Then I made my tomato flowers on a plate. Originally, the recipe said to tie the green stems with a chive like a
bouquet. If you want appetizers, don’t tie the bouquet and make a
single layer of flowers. If you want a decoration, then tie the bouquet.
I
know that trying to pick up the little flower tomato will make the
eater’s hands messy. I think serving them with toothpicks is a better
idea. Below you’ll notice that the green stems do not go into the bottom
of the tomato. I tried both ways (above and below) and believe not all
the guests would want to eat the green chive. Placing the tomato on
the top of the chive gives the same look, but the tomato can be lifted
from the plate with a toothpick without chives.
I started thinking about serving them at the dinner table. I like Roma tomatoes for a good size to make tulips. I again cut a cross on
the top and scooped out the seeds. If the tomato does not have a flat
bottom, cut the bottom to level it. This time I used hummus as the
filler; there are so many flavors I can try. I served the tulip tomato
on a saucer with romaine lettuce for leaves. I think it’s a great first
course or snack. I ate two of them with whole grain crackers for lunch.
I cut the tomato into pieces with a knife and fork and ate it with my
fork. It was yummy, and my hands were clean.
Whether you want small tomato tulips on an appetizer plate or larger Roma sized tulips, choose your filling of choice, make the tulips and
arrange with chosen greenery.
Tomato Tulip Appetizers
Use organic when available. Makes 16 tomato tulips.
Ingredients
Cherry Tomato Tulips
16large cherry tomatoes
16stalks of chives
8ozflavored cream cheese or favorite dip
Roma Tulip Appetizers
1 or 2Roma tomatoes per person
romaine leaves or other green vegetable for each Roma
8oxflavored cream cheese or favorite dip
Instructions
Cherry Tomato Tulips
With stem side down, cut a cross in the top of each cherry tomato (about 1/2 down the tomato).
Using a spoon (grapefruit spoon works very well) to gently scrape out the tomato seeds.
Option
1: Take a grilling skewer or toothpick and make a hole where the stem
currently is. You may need to twist the skewer in a circle a few times
to make room for the chive to fit through.
Option 2: Do not make a hole in the bottom of tomato.
Starting with 1/2 tsp of filling, fill tomato top. Adjust amount according to size of tomato.
Option 1: Insert a chive into the hole at the bottom of each tomato.
Use a damp paper towel to clean any excess filling from outside of tomatoes.
Option 1: Make a bouquet of chive flowers and wrap last chive around the green chive stems and tie.
Option 2: Place green chives on plate or platter like stems of flowers.
Option 2: Place tomato flowers on top of green chives. Add tooth picks.
Cover and refrigerate for several hours.
Serve on plate or platter chilled.
Roma Tomato Tulips
With stem side down, cut a cross in the top of each tomato (about 1/2 down the tomato).
Using a spoon (grapefruit spoon works very well) to gently scrape out the tomato seeds.
Starting with 1 tsp of filling, fill tomato top. Adjust amount according to size of tomato.
Clean outside of tomatoes with damp paper towel.
Shape romaine leaves to look like flower leaves and place on saucer.