Last week at the farmer’s market, one grower had a little packet of fresh new asparagus which reminded me of a spring Quiche. Fresh asparagus, cherry tomatoes, and basil cooked in a cheesy custard sounds perfect for breakfast, lunch, brunch, or even dinner. An asparagus Quiche is one of my favorites for an Easter or spring brunch.
I usually use Swiss cheese but have enjoyed quiches made from a variety of cheeses. Your favorite crust can be used – even store-bought. If you cannot have grains in your diet, you can oil the pie plate and cook the vegetable custard without a crust.
Asparagus & Tomato Quiche
Use organic when available, vegetarian Serves 7 to 8
Ingredients
6 eggs or 4 whole eggs and 2 egg whites
1 bunch of asparagus or 7 or 8 stalks
1 9" pie shell
1/2 cup milk
1 cup cream
1 cup grated cheese, such as Swiss, cheddar, Gruyère
1/4 cup torn fresh basil
1 cup cherry tomato halves
Salt and pepper to taste
optional medium tomato to cut into pinwheel slices for decoration
Instructions
Preheat oven to 425 F or 218 C
Oil pie pan and add dough
Fork bottom of pie crust and cover crust edges with aluminum foil to prevent over-browning
Bake pie crust for about 5 minutes
Remove aluminum foil and bake pie crust for another 8 minutes until almost done
Reduce oven to 325 F or 162 C
Meanwhile, bring water to a boil in a large pot
Cut most of the asparagus into pieces and save some for top of Quiche
Once water is boiling, add the cleaned & trimmed asparagus into pot & boil for 1 minute
Remove immediately and run under cold water to stop the cooking process
Set asparagus aside
Whisk the eggs in a large bowl and add the milk and cream
Whisk together thoroughly and then stir in the shredded cheese, basil, salt & pepper
Add cooked asparagus and tomato slices to bottom of pie shell
Pour custard mix on top
Adorn top with cherry tomatoes and asparagus (optional)
Bake for 35 minutes or until center is firm
Cover edges of crust with aluminum foil if the crust starts to burn
Let quiche stand for at least 5 minutes before cutting
Can be made ahead of time and served at room temperature.
Optional decorate top of quiche with sliced tomato cut into pinwheels in center of top & asparagus around edge pointing in
I’ve been driving around and enjoying scenes here in my home of
Lakeland, Florida. The days are mostly beautiful with blue skies.
Of course, I love to visit the flower department at my local Publix Supermarket. Some things never change no matter where I am in Florida. Floridians love the seasonal flowers that grow up north. Spring flowers, like tulips, are very popular.
Thanks for the visit. I’m wishing you blue skies and tulips wherever you are.
Today we're making food art for spring and Easter. It's a classic bunny cake that has been around since the 1950s.
You can use cake mix or your favorite cake recipe for two 8" or 9" cake pans. I like the coconut version with coconut added to a white or yellow cake and patted on the white icing to make a white bunny look. I've also seen it done without coconut and even in chocolate for an adorable brown bunny.
One cake is the head and the second is cut for other parts. Above are two ears on the sides and the middle piece becomes the bow tie below the rabbit head. You can cover a tray with aluminum foil, parchment paper, or even a big doily. If you like, you can use food color to make some pink icing or coconut for the ears and green to make grass around the bunny head. You can place bunny ears turning up or down.
The easiest decorating is based on white icing, coconut, jelly beans, and other candies like licorice or Twizzlers. If you are a talented cake decorator with icing, I've seen very artistic cakes cut in this shape and totally decorated with icing for eyes, nose, mouth, whiskers, and even flowers. This is a great holiday activity with the kids. Let them decorate the bunny cake.
Easter Bunny Cake
Use organic when available. Makes 12 servings.
Ingredients
28" or 9" layers of yellow or white cake baked
4cupsflaked coconut
white icing for 2 layer cake
optional food coloring for coconut or icing
candy for decorations
Instructions
Cover serving tray with aluminum foil or doily
Remove cool cakes from pans
Place one whole cake layer on serving tray
Cut 2 convex shaped ears from each side of the second layer
Place ears on each side of head to form ears
Use concave shaped piece for the bowtie, place about 1/2 inch below head
Frost each piece of bunny with white icing covering top and sides of bunny.
Frost bowtie with colored icing such as blue or green
Pat remaining coconut evenly over top and sides of bunny head and ears
Use colored frosting, jelly beans, licorice, etc. to decorate cake as desired; licorice can be cut in thin strings for whiskers
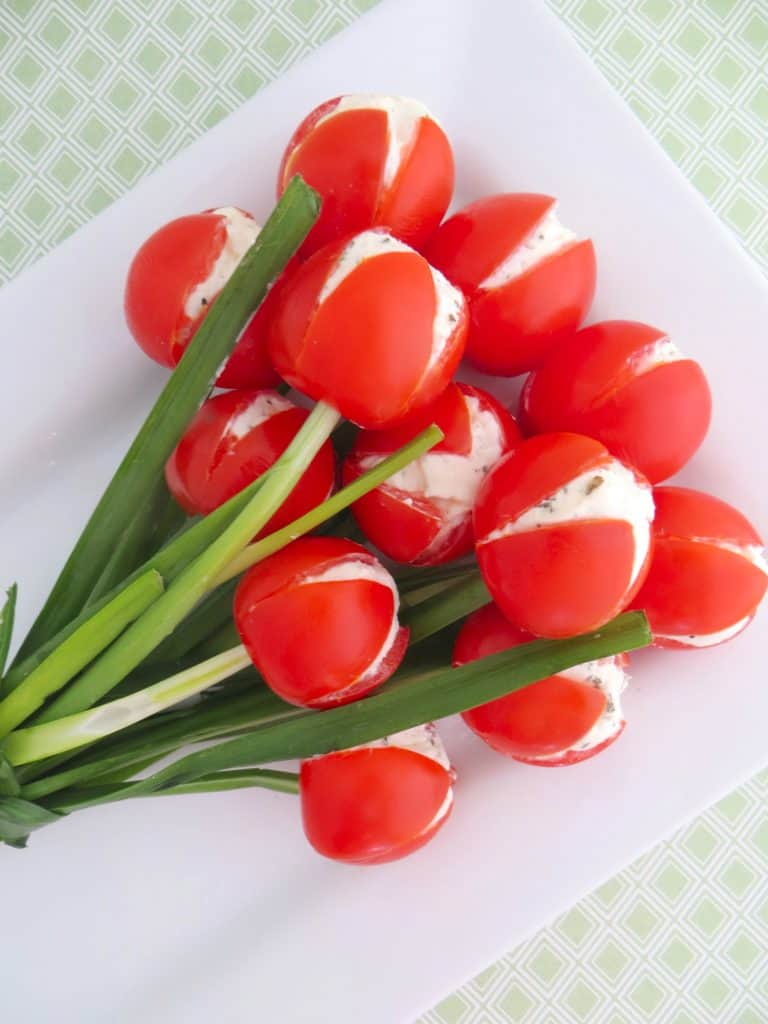
I love cute food art. For the last few years, I’ve been trying some of my favorite pins of Food Art. One of the spring appetizers I love is Tulip Tomatoes. It is shown in a bouquet of tulip tomatoes on chive greenery. It is so cute. Below is the photo found all around the internet.
I like that tulip tomatoes are a healthy side dish perfect for any spring or summer occasion. Everyone says this food art can be created in less than 30 minutes. It took a little longer for me. This post is a little different from most of my food posts. Have you ever tried to replicate a pin and wondered what happened?
Above are more of the original photos on making tulip tomatoes. They
must have originally been on a blog or social media that no longer
exists. I’ve found over 12 blogs with the same photos
and instructions on this food art. My recommendation is to first decide
if you just want a decoration for your table, or if you want appetizers
to eat. If you just want a decoration, go with the idea of a tied
bouquet. If, like me, you want pretty finger food, I’ll try to give you
easy ideas.
The tulip tomatoes are made with mostly fresh ingredients like cucumber, cream cheese, tomatoes, and green onions or chives.
The original instructions say to make a cross on top of large cherry tomatoes, going 3/4 way deep. Scoop out the seeds with a spoon; a grapefruit spoon is suggested. First, DO NOT GO 3/4 DEEP! The little tomato becomes too flimsy and you will have cream cheese everywhere. I know as I did it. I suggest 1/2 deep. Then you use a toothpick or
skewer to make a hole where the stem was on the bottom. Push a green
chive through the hole to make a stem.
The original recipe uses a filling of cream cheese, cucumber, and dried
parsley. It really sounds a little bland to me, and I added lemon juice
too. It was still too bland. I think the dried parsley would add more
flavor if it is added to the cream cheese and put back in the
refrigerator for a day. The original recipe says to use a teaspoon full
of cream cheese mix in each tomato. I bought large cherry tomatoes, and
they are still small for 1 teaspoon. I saw another blogger piped the
filling in which probably makes it easier to fill the tomato. It is a messy procedure filling the top
with a spoon and keeping the chive in the bottom hole. I had lots of
leaks from both ends. Use a clean paper towel to clean the outside of each tomato.
I believe a better filling would perk up the taste of the little
appetizer. I was tempted to just buy garlic and onion cream cheese when
I went shopping for the ingredients. I think that or the herb flavored
cream cheese would be tasty and so easy to use. I think that adding
minced or processed cucumber makes the cream cheese too watery.
Cucumbers are pretty much water in composition.
You could try your favorite dip as long as it is firm enough. Over on One Little Project, Debbie makes a whipped Feta/cream cheese filling.
It sounds interesting. Then I made my tomato flowers on a plate. Originally, the recipe said to tie the green stems with a chive like a
bouquet. If you want appetizers, don’t tie the bouquet and make a
single layer of flowers. If you want a decoration, then tie the bouquet.
I
know that trying to pick up the little flower tomato will make the
eater’s hands messy. I think serving them with toothpicks is a better
idea. Below you’ll notice that the green stems do not go into the bottom
of the tomato. I tried both ways (above and below) and believe not all
the guests would want to eat the green chive. Placing the tomato on
the top of the chive gives the same look, but the tomato can be lifted
from the plate with a toothpick without chives.
I started thinking about serving them at the dinner table. I like Roma tomatoes for a good size to make tulips. I again cut a cross on
the top and scooped out the seeds. If the tomato does not have a flat
bottom, cut the bottom to level it. This time I used hummus as the
filler; there are so many flavors I can try. I served the tulip tomato
on a saucer with romaine lettuce for leaves. I think it’s a great first
course or snack. I ate two of them with whole grain crackers for lunch.
I cut the tomato into pieces with a knife and fork and ate it with my
fork. It was yummy, and my hands were clean.
Whether you want small tomato tulips on an appetizer plate or larger Roma sized tulips, choose your filling of choice, make the tulips and
arrange with chosen greenery.
Tomato Tulip Appetizers
Use organic when available. Makes 16 tomato tulips.
Ingredients
Cherry Tomato Tulips
16large cherry tomatoes
16stalks of chives
8ozflavored cream cheese or favorite dip
Roma Tulip Appetizers
1 or 2Roma tomatoes per person
romaine leaves or other green vegetable for each Roma
8oxflavored cream cheese or favorite dip
Instructions
Cherry Tomato Tulips
With stem side down, cut a cross in the top of each cherry tomato (about 1/2 down the tomato).
Using a spoon (grapefruit spoon works very well) to gently scrape out the tomato seeds.
Option
1: Take a grilling skewer or toothpick and make a hole where the stem
currently is. You may need to twist the skewer in a circle a few times
to make room for the chive to fit through.
Option 2: Do not make a hole in the bottom of tomato.
Starting with 1/2 tsp of filling, fill tomato top. Adjust amount according to size of tomato.
Option 1: Insert a chive into the hole at the bottom of each tomato.
Use a damp paper towel to clean any excess filling from outside of tomatoes.
Option 1: Make a bouquet of chive flowers and wrap last chive around the green chive stems and tie.
Option 2: Place green chives on plate or platter like stems of flowers.
Option 2: Place tomato flowers on top of green chives. Add tooth picks.
Cover and refrigerate for several hours.
Serve on plate or platter chilled.
Roma Tomato Tulips
With stem side down, cut a cross in the top of each tomato (about 1/2 down the tomato).
Using a spoon (grapefruit spoon works very well) to gently scrape out the tomato seeds.
Starting with 1 tsp of filling, fill tomato top. Adjust amount according to size of tomato.
Clean outside of tomatoes with damp paper towel.
Shape romaine leaves to look like flower leaves and place on saucer.
When you need a lighter, healthy meal, an entree salad can hit the
spot and make you smile. My shrimp and asparagus salad with oranges is a
perfect example. It’s a delightful spring salad with fresh greens,
orange segments, asparagus, shrimp, and a lovely citrus vinaigrette.
It’s fast and so tasty. In 20 minutes, you can be sitting with your
family and friends and enjoying the flavor. You can serve a small
version of this salad as a first course, but I love it as an entrée.
I’m using quick broiled shrimp, but you can also use any cooked shrimp
like grilled, boiled, or sautéed.
My fresh greens today are arugula (rocket). The arugula adds a
peppery note to the salad. You may use all arugula, a mix of arugula and
baby spinach, or even all baby spinach if you’re not an arugula fan.
Shrimp & Asparagus Salad With Oranges
Use organic when available. Makes 2 entrée salads or 4 first course salads
Ingredients
Salad
1lbmedium shrimp peeled and de-veined
2tbspfresh lemon juice
3tbspolive oil
2cupsasparagus chopped about 1" (about 1 lb)
2oranges
5ozfresh greens: arugula, baby spinach or mix of both
Vinaigrette
1/4cupextra-virgin olive oil
2tbsporange juice from segmenting oranges
1tbspbalsamic or red wine vinegar
squeeze of a fresh lemon
1/2tsphoney
1/2tspDijon mustard
Salt and pepper to taste
Instructions
Salad
Preheat broiler
Bring a medium pot of water to a boil
Place shrimp in large bowl and add lemon juice and 3 tbsp of olive oil with dash of salt
Stir and coat shrimp well
Cover broiler pan with non-stick foil and place shrimp in single layer on pan
Place pan on the top rack, a few inches below the element
Broil about 1½ minutes or more per side, just until shrimp turn pink
Let shrimp cool while you make salad
With a sharp knife carefully slice off the top and bottom of each orange over bowl
Slice the skin away from the flesh and discard
Remove any remaining white pith
Cut between the membranes to segment orange retaining any juices in bowl for vinaigrette
Squeeze membranes for more juice into bowl
Set juice aside to make vinaigrette
Add chopped asparagus to boiling water
Cook asparagus 3 to 4 minutes until bright green
Remove asparagus from hot water and plunge into cold water to stop cooking
In large serving bowl mix orange sections with cooled asparagus and shrimp
Pour vinaigrette over and toss to coat
Divide fresh greens onto 2 plates for entrées or 4 salad plates or bowls for 1st course
Top with shrimp and asparagus/orange mix
Optional garnish with seeds or nuts for crunch
Serve with crusty rolls or bread
Vinaigrette
Combine ingredients in a blender and process until smooth, about 20–30 seconds
“May the Road Rise to Meet You” is an Irish blessing that is often used as a prayer. It has traveled throughout the centuries in songs, word of mouth, and even a popular cross-stitch pattern. The words connect centuries of those who have faithfully hung onto hope through their faith.
"May the road rise to meet you" was originally written in Gaelic. The phrase is actually mistranslated quite a bit from the original Gaelic language it was written in. “Rise” actually translates more accurately to “succeed.” So the text means,“May you succeed on your road.” The link on the text is to Crosswalks post on the origin and meaning of the saying including the longer original verses.
The author of the blessing isn't known. Many attribute it to Saint Patrick, as it resembles some of his writings. The Irish like to use images of nature and everyday life in their blessings and prayers. Just as the blessing starts with a prayer for you to succeed on your road in life, it also ends with an image of safety as we are held in the palm of God's hand.


.jpg)
