Today I’m trying a fun food for all your spring and Easter
get-togethers, a Spring Vegetable Garden using hummus and fresh baby
carrots, radishes, asparagus, celery, peppers, and sugar snap peas. You
can vary the vegetables according to your preference and availability.
Use the smallest part of your celery bunch with the green attached. I’m
currently able to get local baby carrots with greens attached. There is
so much greens I must remove half or it fills the dish. If you can’t get those, use small carrots and even cut them smaller and shorter. Watch for spring crops of asparagus and the fresh little peas. You can cut half off so it fits the dish. (For my far north readers, pin this recipe for your spring crops later.)
I’m using my basic hummus recipe, but feel free to use your favorite.
Double the basic hummus recipe using 2 drained cans of chickpeas. If
buying commercial hummus, use 2 10-oz. hummus containers. This is the
base for your garden and should be at least one inch deep in your dish.
You may substitute your favorite dip if it is thick enough to support
your little veggies in a vertical position.
Classic Hummus
Use organic when available. It's great with veggies or pita chips as an appetizer or snack.
Servings 4
Ingredients
1 (15 ounce) can garbanzo beans, drained, liquid reserved
1tbsplemon juice
1tbspolive oil
1clove garlic, crushed
1/2tspground cumin
1/2tspsalt
2dropssesame oil, or to taste (optional)
baby veggies or cut veggies like carrots, celery, spring peas, radishes, asparagus, peppers
Instructions
Place all ingredients in food processor
Blend until smooth
Stream reserved bean liquid into the mixture as it blends until desired consistency is achieved but keep it thick for appetizer garden
Double recipe for hummus
Instructions for Spring Garden Appetizer
Double recipe for hummus or use your favorite dip
Fill bottom of serving dish with 1 to 2 inches of hummus
Place baby veggies in the hummus vertically
Serve with pita chips or veggies
Enjoy!
Spring Hummus Vegetable Garden Appetizer
Use organic when available, serves 6
Ingredients
20ozor more of hummus or dip
6small carrots with green attached
6celery heart stalks with green attached
6asparagus
6radishes with greens attached
6sugar snap peas or snow peas
6small peppers
optional fresh parsley or other herb for garnish
Instructions
Spread hummus to fill bottom of a deep baking dish 2 to 3 inch
If desired, blanch asparagus (I like them raw, but it's an option)
Cut asparagus in half
Cut radishes in half
Cut any celery, carrots, or peas that are too tall
Arrange a row of carrots like a garden
Repeat with celery, radishes, sugar snap peas, peppers, and asparagus
You should now have 6 rows of veggies
Optional garnish with fresh herbs
Serve with whole grain crackers and a tray of more spring veggies
Enjoy!
This dish was shared on St. Pete’s Channel 10, Good to Know Segment:
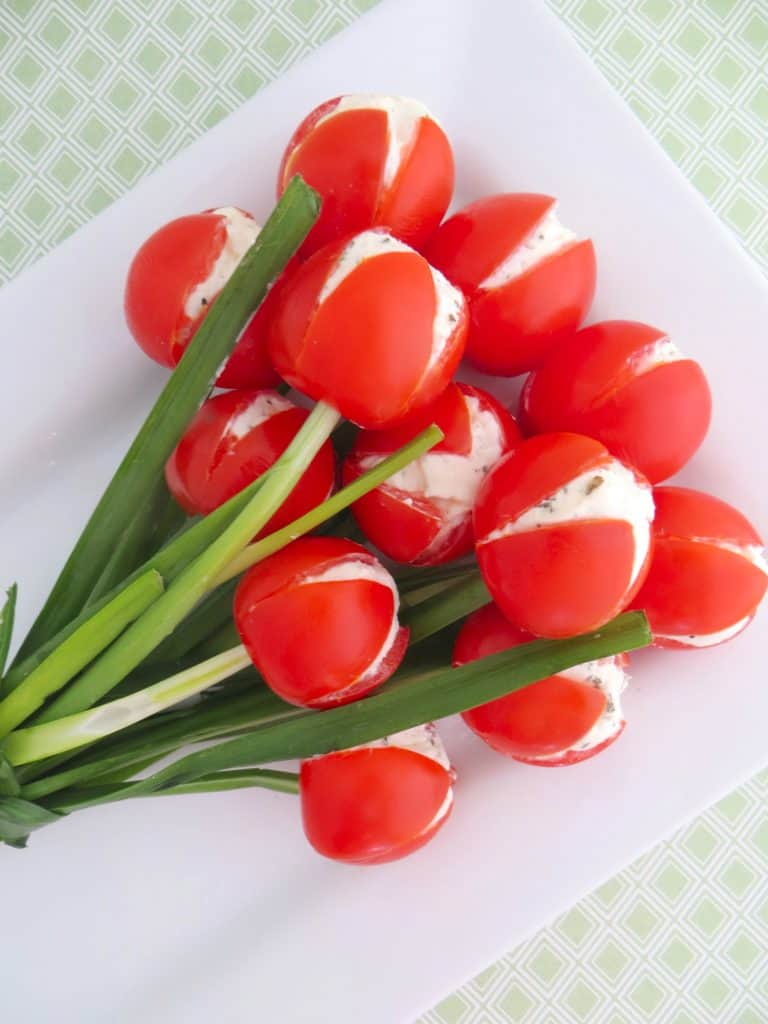
I love cute food art. For the last few years, I’ve been trying some of my favorite pins of Food Art. One of the spring appetizers I love is Tulip Tomatoes. It is shown in a bouquet of tulip tomatoes on chive greenery. It is so cute. Below is the photo found all around the internet.
I like that tulip tomatoes are a healthy side dish perfect for any spring or summer occasion. Everyone says this food art can be created in less than 30 minutes. It took a little longer for me. This post is a little different from most of my food posts. Have you ever tried to replicate a pin and wondered what happened?
Above are more of the original photos on making tulip tomatoes. They
must have originally been on a blog or social media that no longer
exists. I’ve found over 12 blogs with the same photos
and instructions on this food art. My recommendation is to first decide
if you just want a decoration for your table, or if you want appetizers
to eat. If you just want a decoration, go with the idea of a tied
bouquet. If, like me, you want pretty finger food, I’ll try to give you
easy ideas.
The tulip tomatoes are made with mostly fresh ingredients like cucumber, cream cheese, tomatoes, and green onions or chives.
The original instructions say to make a cross on top of large cherry tomatoes, going 3/4 way deep. Scoop out the seeds with a spoon; a grapefruit spoon is suggested. First, DO NOT GO 3/4 DEEP! The little tomato becomes too flimsy and you will have cream cheese everywhere. I know as I did it. I suggest 1/2 deep. Then you use a toothpick or
skewer to make a hole where the stem was on the bottom. Push a green
chive through the hole to make a stem.
The original recipe uses a filling of cream cheese, cucumber, and dried
parsley. It really sounds a little bland to me, and I added lemon juice
too. It was still too bland. I think the dried parsley would add more
flavor if it is added to the cream cheese and put back in the
refrigerator for a day. The original recipe says to use a teaspoon full
of cream cheese mix in each tomato. I bought large cherry tomatoes, and
they are still small for 1 teaspoon. I saw another blogger piped the
filling in which probably makes it easier to fill the tomato. It is a messy procedure filling the top
with a spoon and keeping the chive in the bottom hole. I had lots of
leaks from both ends. Use a clean paper towel to clean the outside of each tomato.
I believe a better filling would perk up the taste of the little
appetizer. I was tempted to just buy garlic and onion cream cheese when
I went shopping for the ingredients. I think that or the herb flavored
cream cheese would be tasty and so easy to use. I think that adding
minced or processed cucumber makes the cream cheese too watery.
Cucumbers are pretty much water in composition.
You could try your favorite dip as long as it is firm enough. Over on One Little Project, Debbie makes a whipped Feta/cream cheese filling.
It sounds interesting. Then I made my tomato flowers on a plate. Originally, the recipe said to tie the green stems with a chive like a
bouquet. If you want appetizers, don’t tie the bouquet and make a
single layer of flowers. If you want a decoration, then tie the bouquet.
I
know that trying to pick up the little flower tomato will make the
eater’s hands messy. I think serving them with toothpicks is a better
idea. Below you’ll notice that the green stems do not go into the bottom
of the tomato. I tried both ways (above and below) and believe not all
the guests would want to eat the green chive. Placing the tomato on
the top of the chive gives the same look, but the tomato can be lifted
from the plate with a toothpick without chives.
I started thinking about serving them at the dinner table. I like Roma tomatoes for a good size to make tulips. I again cut a cross on
the top and scooped out the seeds. If the tomato does not have a flat
bottom, cut the bottom to level it. This time I used hummus as the
filler; there are so many flavors I can try. I served the tulip tomato
on a saucer with romaine lettuce for leaves. I think it’s a great first
course or snack. I ate two of them with whole grain crackers for lunch.
I cut the tomato into pieces with a knife and fork and ate it with my
fork. It was yummy, and my hands were clean.
Whether you want small tomato tulips on an appetizer plate or larger Roma sized tulips, choose your filling of choice, make the tulips and
arrange with chosen greenery.
Tomato Tulip Appetizers
Use organic when available. Makes 16 tomato tulips.
Ingredients
Cherry Tomato Tulips
16large cherry tomatoes
16stalks of chives
8ozflavored cream cheese or favorite dip
Roma Tulip Appetizers
1 or 2Roma tomatoes per person
romaine leaves or other green vegetable for each Roma
8oxflavored cream cheese or favorite dip
Instructions
Cherry Tomato Tulips
With stem side down, cut a cross in the top of each cherry tomato (about 1/2 down the tomato).
Using a spoon (grapefruit spoon works very well) to gently scrape out the tomato seeds.
Option
1: Take a grilling skewer or toothpick and make a hole where the stem
currently is. You may need to twist the skewer in a circle a few times
to make room for the chive to fit through.
Option 2: Do not make a hole in the bottom of tomato.
Starting with 1/2 tsp of filling, fill tomato top. Adjust amount according to size of tomato.
Option 1: Insert a chive into the hole at the bottom of each tomato.
Use a damp paper towel to clean any excess filling from outside of tomatoes.
Option 1: Make a bouquet of chive flowers and wrap last chive around the green chive stems and tie.
Option 2: Place green chives on plate or platter like stems of flowers.
Option 2: Place tomato flowers on top of green chives. Add tooth picks.
Cover and refrigerate for several hours.
Serve on plate or platter chilled.
Roma Tomato Tulips
With stem side down, cut a cross in the top of each tomato (about 1/2 down the tomato).
Using a spoon (grapefruit spoon works very well) to gently scrape out the tomato seeds.
Starting with 1 tsp of filling, fill tomato top. Adjust amount according to size of tomato.
Clean outside of tomatoes with damp paper towel.
Shape romaine leaves to look like flower leaves and place on saucer.


.jpg)